
Style, Delivery, & Audience Engagement
12 Visual Aids
Learning Objectives
- Name the goals of using visual aids in public speaking
- Distinguish the advantages and challenges of three types of digital visual aids
- Identify how visual aids can promote or hamper civic engagement
- Construct visual aids that fulfill eight design principles
- Use visual aids effectively during a speech by following five usage principles
Reflect on the last YouTube or TikTok video you watched, the last meme you viewed on social media, or even a lecture you heard that used presentation software like PowerPoint. Now try to think of a public speech you heard that did not include any visual aids—no photographs or video clips, no infographics or charts, no virtual backgrounds, and no words or symbols visually imposed onto a screen. It’s hard to do, right? Imagining public speaking today without visual aids is increasingly difficult.
We define a visual aid as anything optical that enhances speech or even functions as speech. This definition can encompass aspects of nonverbal delivery (think of a speaker’s clothing choices, for instance) and televisual delivery (such as a speaker’s use of lighting or camera angles), both of which we explored in chapter 11. In this chapter, we will focus on additional types and uses of visual aids, primarily spotlighting such digital options as presentation software, video, and audience-interactive visual aids.

In many cases, visual aids enhance speech by supplementing or illustrating what is being said. Think, for example, about how a line graph might visually illustrate a speaker’s claims about changes in college tuition rates over the past four decades.
Visual aids can also function as speech themselves, however. To demonstrate, reflect on why so many US political candidates feature the American flag in their advertisements. They hope to associate themselves with what the flag can communicate: liberty, justice, and patriotism. Indeed, in our multimedia-saturated culture, audiences are inundated with visual images that attempt to shape their perceptions and actions. In that sense, such images “aid” speakers by communicating with and for them rather than simply by enhancing speakers’ words.
In this chapter, we introduce you to visual aids for public speaking. We first establish the desired goals of using visual aids. We then review three of the most common types of digital visual aids: presentation software, video, and audience-interactive visual aids before considering how visual aids can promote or hinder civic engagement. With this guidance, you will be ready to choose the types of visual aids you want to use and establish goals for doing so. The second half of this chapter will help you effectively design the visual aids and use them during your speech.
Goals of Using Visual Aids
You may find it easier to create visual aids for your speech if you first identify what you hope to accomplish with them. We suggest you consider at least four goals for your direct audience (or those who are exposed to and attend to your speech): increase the clarity of your message, enhance audience attention and recall, strengthen your credibility, and improve your attempt to inform or persuade the audience.
Increase Clarity
Visual aids have the power to make your ideas clearer to your audience. Many audience members are visual learners, and well-designed visual aids help them comprehend what you are saying. Infographics, for instance, are named as such because they clearly communicate (often numerical) information through visual means.

Similarly, a visual aid can help your audience comprehend an abstract concept or complex event. Indeed, some photographs have become iconic because they clearly sum up a complex historical moment. Examples include photographs of the bombing of the World Trade Center on September 11, 2001, or a photograph of Neil Armstrong walking on the moon.
Beyond that, it is likely in our increasingly globalized world that members of your audience may have different levels of fluency with the language you speak. Furthermore, depending on the content and your professional specialty, audience members will have different levels of familiarity with the technical knowledge or specialized language of your topic. In these cases, visual aids can help define terms and clarify concepts and ideas.
Improve Audience Attention and Recall
Visual aids can also help hold or increase your audience’s attention. If members of the audience find their minds wandering—or if one or two listeners glance at an incoming text message—the introduction of a new image or the change of a slide can draw their attention back to your speech. Well-planned and well-designed images make your speech more interesting. When someone later asks an audience member what your speech was about, a person might recall a visual image from your presentation. The image assists the audience in remembering your message after the fact.
Strengthen Your Credibility as a Speaker
Also importantly, effective visual aids can increase your credibility as a speaker. They illustrate to your audience how carefully you researched, crafted, and incorporated visual aids into your speech. Proper citations of images or charts you adopt further enhance your credibility. Remember, however, that the inverse is also true: A hastily prepared or poorly cited visual presentation can undercut an otherwise well-prepared speech.
Additionally, good visual aids foreground your ideas. An effective visual aid increases your credibility precisely because it helps your audience grasp what you want to communicate. “That person was a great communicator!” someone might say when recalling your speech. “Their points were very clear.”
Improve Your Effort to Inform or Persuade
Ultimately, visual aids should serve your speaking goal, whether that is to inform your audience or to persuade them. Think of your visual aids as another form of support for your thesis or main points. When integrated smoothly into a speech, visual aids can strengthen your explanations and evidence. However, poorly designed or executed visual aids can distract or confuse an audience, hurting your ability to inform or persuade them.
In addition, recall that visual aids not only enhance communication but also can function as speech themselves. Earlier we mentioned the American flag as an example. We might also think of such resonant visual symbols as a dove or peace sign, a rainbow, or even a skull and bones. In such cases, the visual images can aid your attempt to inform or persuade by communicating meaning or even emotions.
You might draw on these four goals to guide your creation of visual aids and to evaluate whether and how well they function after you’ve designed them. Use your evaluation to revise or even cut visual aids from your speech when they do not serve clear ends.
Box 12.1 Goals of Visual Aids
Effective visual aids should accomplish the following four goals:
- heighten the clarity of your speech
- help the audience attend to and recall your message
- increase your credibility as a speaker
- improve your effort to inform or persuade the audience
Types of Visual Aids
There are several analog (nondigital) visual aids available for public speaking, such as handouts, props, or charts. In today’s world of omnipresent technology, however, most people use digital visual aids, particularly presentation software, video, and audience-interactive visual aids. In this section, we will consider each of these digital visual aids, focusing on their advantages and challenges for speakers. Use these insights to determine which type(s) best serve your needs.
Presentation Software
You are likely already familiar with presentation software such as Microsoft PowerPoint, Google Slides, and Canva Presentations. Such programs are designed as digital slide shows, and thus, presenters tend to refer to their digital visual aids as “my slides.” A slide deck is your set of digital visual aids, no matter which software brand you use. Presentation software offers many advantages to speakers.
Advantages
Presentation software is popular for a reason. It is incredibly versatile. Using this software, you can typically
- import images,
- create graphs,
- embed audio and video content into your slides, and
- give your slides a uniform design for a more coherent and polished appearance.
Indeed, presentation software allows you tremendous control over the following:
- The look of your slides, including the placement of each item.
- The timing of each slide. As a speaker, you choose when to show each slide and for how long simply by choosing the slides’ order and deciding when to “click through” to the next slide.
- When an audience no longer sees any slides. If you want a blank screen during part of your speech, simply include a blank slide to achieve that effect.
- Learning how to design and use slides effectively takes some work. Fortunately, tutorials and advice are freely available online. You can find video tutorials for all the presentation software previously mentioned—Microsoft PowerPoint, Google Slides, and Canva Presentations—by searching in a web browser for its name and adding the word “tutorial.” Similarly, searching for “presentation software dos and don’ts” results in several websites, blogs, and videos with helpful advice.
Challenges
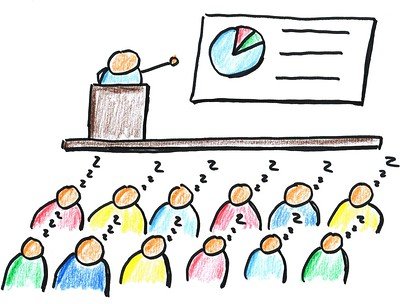
While advice is readily available about using presentation software well, so, too, are endless jokes and cartoons about misusing slide decks. Many jokes poke fun at lulling the audience to sleep by overly relying on presentation software.
Most of us dread a speaker who loads their slide deck for a short speech and has forty slides lined up. Not everything you say needs to have a corresponding slide!
Remember you are giving the speech and should be able to communicate vocally without always relying on visual aids for help. Use slides only when they fulfill the four goals previously mentioned. Otherwise, too many slides will obscure rather than clarify your points, overwhelm your audience rather than aid their attention and recall, weaken rather than strengthen your credibility, and hurt rather than aid your effort to inform or persuade.
A related challenge of presentation software is that it tends to lure speakers into featuring too much text (words), often in an outline or bulleted lists. Speakers may even be tempted to use their slides as speaking notes. Stop yourself from falling into this trap!
- Utilize the techniques discussed in chapter 7 to vocally (not visually) communicate your thesis, main points, and transitions.
- Turn to chapter 8 to prepare and use a presentation outline or manuscript—not your slides—as your speaking notes, depending on your selected mode of delivery.
- Rely on your slides, instead, to feature optical elements you cannot achieve through words alone. You might include a photograph that clarifies your point, a visual symbol that aids your persuasion, a short video clip that helps the audience recall your thesis, or a correctly cited graph that increases your credibility.
As you find or create visual elements for your slides, avoid using the first photograph, chart, or infographic you find. Too often students think they should wholesale copy and paste a visual aid they locate online, perhaps because it relates to their topic and looks attractive. However, not only should you be wary of copyright infringement—discussed below—but you should also evaluate how well the visual element suits your needs.
When you find an image you like, ask yourself if it supports your specific speaking goal, thesis, or point. If a visual aid features more than what you really need, consider changing it. You might do the following:
- Adapt the preexisting visual aid (such as cropping a photograph you find).
- Re-create the parts you need (such as reproducing a bar chart with only the bars you want the audience to focus on—like we demonstrate in box 28.2).
- Use the preexisting visual aid to inspire your own visual production. Can you take a photograph that will better feature what you want the audience to see or notice locally? Can you create an infographic that visually demonstrates the main statistic you want to emphasize?
Box 12.2 “Ready-Made” Versus Customized Visual Aids
Imagine a student’s speech is about teenage alcohol consumption, and they want a slide that conveys relevant statistics.
Slide A: The following chart is a “ready-made” image the student might find online. It includes information about teenage alcohol use (the blue and gray bars) but much more irrelevant information (for their topic) as well. Audiences would struggle to focus only on the teenage consumption visualized in the chart.
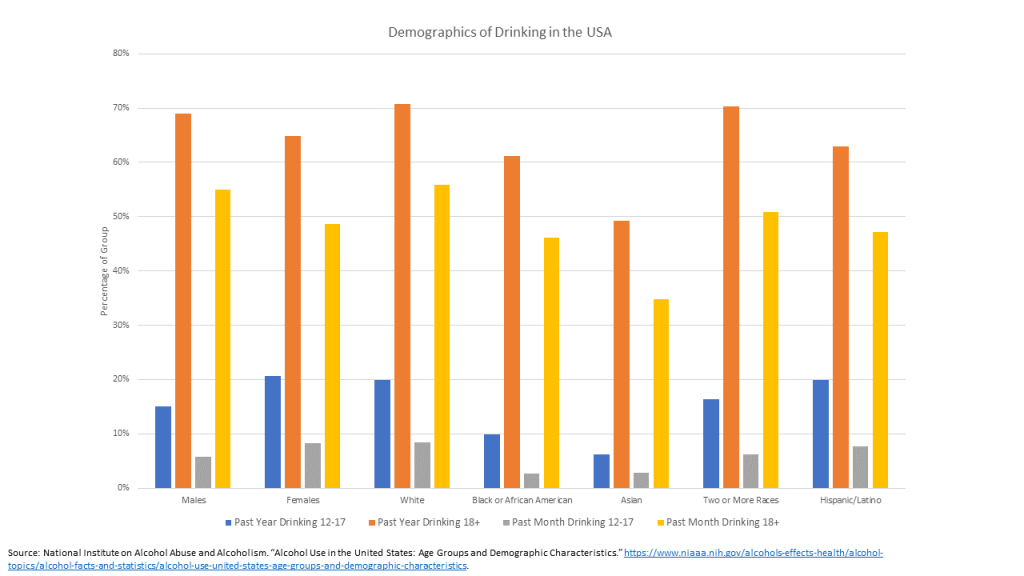
Slide B: In this slide, the student made their own customized version of the chart in slide A. Notice how much more effectively it focuses the audience’s attention only on teenage alcohol consumption.

We offer several more design and usage principles in below that apply to presentation software. For now, we end with a caution about using features like transitions and animations. These have the tendency to look more amateur than professional. They also typically distract and confuse the audience instead of clarifying points. We believe visual aids are most effective when they are elegantly simple.
Video
 Public speakers today frequently draw on video, or a recording of moving images, to visually aid their presentations. Some incorporate short video clips or animated GIFs into their speeches. Others record themselves speaking and edit the video to visually enliven their presentation, such as by creating split screens or showcasing picture-in-picture. Still others stitch together visual images and video clips while narrating their speech through voice-over. Of course, these three uses of video are not mutually exclusive! Consider some of the more sophisticated YouTube channels you watch; you likely see all three in one presentation.
Box 12.3 Video in Practice

Caitlyn Doughty showcases many uses of video on her YouTube channel, “Ask a Mortician.” As a mortician, author, and advocate, Doughty uses her channel to educate her two million subscribers about death and to model a more positive orientation toward death. She also advocates for options like legal human composting as an environmentally friendly alternative to burial or cremation.
Her YouTube videos regularly incorporate video clips, highlight such editing as picture-in-picture, and feature her voice narrating videos and other visual imagery. Together, her use of video encourages viewers to think and talk about the often-taboo subject of death.
If you want to use video as a visual aid, several software brands are available to help you record and edit videos. A few notable examples are iMovie, Adobe Premiere (Pro and Rush), Microsoft Clipchamp, ScreenPal, and Screencastify. Some are completely free, while others are premium, meaning they cost money to use. Still others, referred to as freemium, allow users to freely use a few basic features but require payment to access more sophisticated or advanced tools. Check your college or university resources to learn if they provide students free access to software that would otherwise cost money to use. Choosing video as a visual aid, whether by using your phone or specialized software, offers speakers several advantages and challenges.
Advantages
Video can be an engaging and powerful visual aid. A video clip reignites the audience’s interest because it introduces something new to listen to and watch. Somewhat similarly, an animated GIF can offer humor and draw in your audience through a popular culture reference.
- Video can also function as powerful support for your speech. Using video, you can
- literally show your audience examples of the problem, place, or people you are describing;
- showcase a person offering emotionally moving testimony about their personal experience; or
- feature an expert explaining a concept or finding, which should strengthen your argument and credibility.
Perhaps one of the greatest advantages of using video, however, is the creativity it offers, especially if you prerecord your presentation. Even if you simply record yourself speaking, you can do so in ways that are visually clever or inventive.
If you want to incorporate more traditional visual aids into a prerecorded speech, you might leave space in the camera frame while recording to later edit in photographs, charts, or graphs. As we demonstrate in box 12.4, you might even gesture to that open space as you talk about the visual aid in the recording (a little like using a green screen).
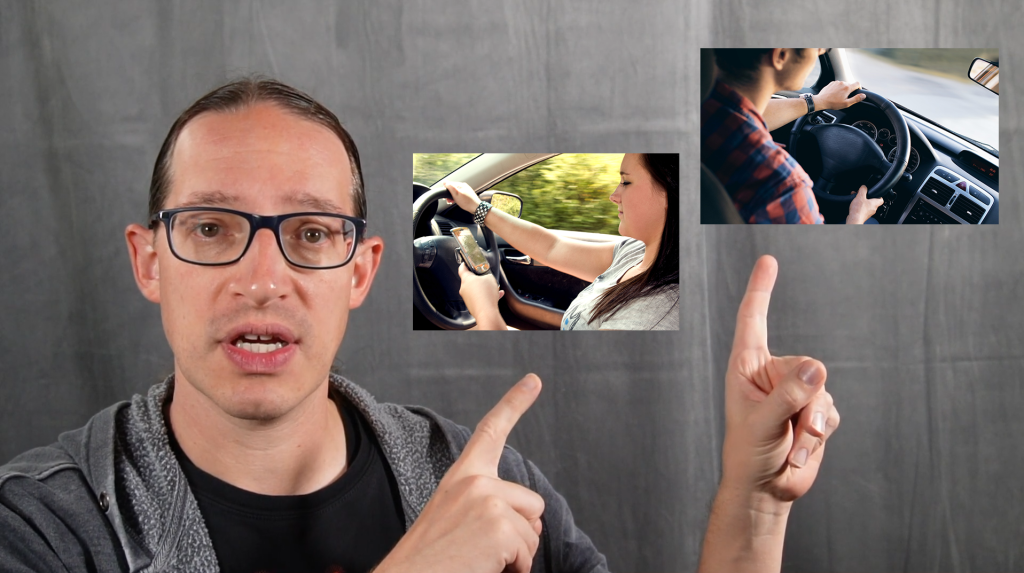
Box 12.4 Leaving Room in a Video Frame for a Visual Aid
The left image exemplifies a still shot from a prerecorded speech about texting while driving. Notice how the student purposefully left room in the shot and gestured toward the contrasting visual aids that he later edited into the shot, which you can see in the right image.

If you are more creatively ambitious, use video software to layer tracks, such as:
-
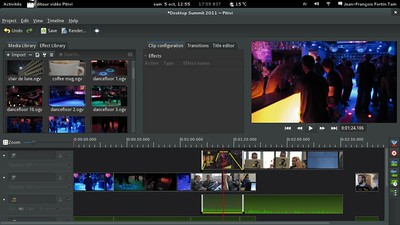
Pitivi Video Editor by Linux Screenshots via Flickr, CC BY. a video track focused on you speaking,
- a track of your audio alone (likely extracted from your video track with the software’s help),
- a track of relevant audio clips you import, and
- a track of alternative visual aids you produce.
You can edit the video strategically to choose which tracks viewers see and hear as the video plays.
Alternatively, you might animate your video by drawing pictures that visually illustrate or bring your ideas to life while narrating your points through an audio recording. Whatever forms of video you choose, the options for creating visual aids are almost as broad as your creativity and imagination allow.
If you prerecord your presentation, another advantage of using video for your visual aid is the ability to review and redo it. You can adjust the placement of your images or the timing of your animations, for instance, for maximum impact. If you give yourself enough time, you can ensure that your visual aids appear sleek and professional, increasing your credibility.
Challenges

Time is a major challenge when using video for your visual aid:
- At a minimum, a speaker who shows a video clip during their presentation must first produce or find the clip and then leave time during their speech to introduce, show, and draw conclusions from it.
- At a maximum, a speaker who prerecords their speech must set up their shots, audio clips, and other images; record themselves; layer their tracks; edit the video; finalize the video when satisfied; and upload it to the internet or download it as a file before it’s ready to be viewed. Students are often shocked at how long that process takes—much longer than they anticipate.
- Furthermore, impactful speakers practice or review their presentation and adjust their video visual aid if needed. That could entail altering when you begin or end a video clip or even rerecording and reediting your presentation.
Another challenge when using video as a visual aid is the temptation to use clips, animations, or backgrounds that are attention getting but do not actually serve your speech. Too often students throw in a funny or fast-moving video or GIF that elicits an initial reaction from the audience but ultimately leaves them (or your instructor) confused and distracted. Your visual aids should directly support your thesis or main points, not just relate loosely to your topic.
Finally, using video well can be difficult. It requires extra setup when speaking synchronously (live). You have to make sure the clip is accessible and ready to play and/or able to be seen and heard accurately (especially when sharing your screen while speaking remotely).
When prerecording your presentation, it is especially difficult to create a video that is professional looking. Social media influencers and celebrities make it seem easy, because they typically employ people who work behind the scenes to produce their final products. Fortunately, you can improve the look of your videos by learning from free tutorials online, which are available from most software brands and vloggers that teach the basics.
If you put in the time to learn the software, practice with it, and revise your work, you will likely produce video visual aids that make your speech compelling.
Audience-Interactive Visual Aids
Image by US Department of Agriculture via Flickr, CC BY
We are referring to a third kind of digital visual aid as audience-interactive because they rely on the audience’s input in real time to produce imagery. They can be used when speaking in person or remotely through a screen, but they require an audience who is watching synchronously.
As examples of audience-interactive visual aids, a speaker might
- poll the audience and then visually display the results,
- ask and then show the audience’s answers to a question, or
- display a word cloud that results from descriptive words the audience provides about a topic.
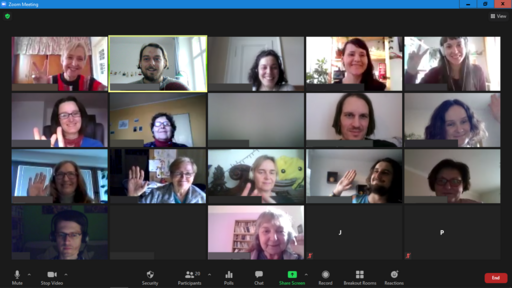
Alternatively, a speaker might invite audience members watching remotely to provide real-time reactions that the speaker shows and incorporates into their speech. For instance,
- A speaker might invite audience members to send a chat that is visually overlaid into the video “live” as the speaker streams their speech.
- If using video conference software like Zoom, a speaker might ask the audience to
- raise their hands or
- select a visual emoji “reaction,” such as a heart, thumbs-up, or sad face, that everyone can see immediately.
Box 12.5 Audience-Interactive Visual Aids in Practice

Audience-interactive visual aids are used for a wide variety of purposes, including civic ends. For examples, we can look to Twitch, a global streaming service that offers over 100,000 live broadcasts at any one time in over thirty languages. While Twitch is typically associated with video games, some Twitch streamers provide commentary on civic issues.
Streamers such as Hasan Piker (who goes by HasanAbi) and Morgan (who goes by Frogan) use their popularity to engage political affairs and public health concerns (respectively). Their broadcasts typically incorporate visual displays of viewers’ live chats, including negative and critical comments, many of which they respond to immediately.
This audience-interactive visual aid helps make the experience more meaningful for viewers because their comments directly influence what the speaker says as their speech unfolds. Such influence helps them feel more connected to the speaker and lends a greater sense of authenticity to their exchange.
As discussed in box 12.5, Twitch lends itself to audience-interactive visual aids, but so do many other tools. Examples that may be used whether you speak in person or remotely include Mentimeter, Socrative, and PollEverywhere. As with video, software for audience-interactive visual aids ranges from premium (payment required) to freemium (payment necessary to use advanced tools) to free. Check with your university or college to discover what software it might give you access to for free. Using audience-interactive visual aids offers many advantages.
Advantages
Speakers who use audience-interactive visual aids recognize the audience’s active role in cocreating meaning. Recall that in chapter 2, we discussed the audience’s central role in negotiating meaning with a speaker. Using audience-interactive visual aids is one way of honoring the audience’s centrality to public speaking and acknowledging the important part they play in coproducing communication. Audiences typically appreciate such recognition and empowerment.
By allowing the audience to have such direct input, audience-interactive visual aids additionally provide speakers with useful insights.
- On the one hand, you can learn from your audience. Their ideas and views can develop your own understanding of, and thinking about, your topic or thesis. You might be surprised, for instance, at the words they choose for a word cloud or by their answers to a poll.
- On the other hand, you can learn about your audience and better adapt your speech to them. Their responses can help you make on-the-fly adjustments to how you find common ground with them or the supporting appeals you feature.
- Relatedly, your audience members can learn more about one another, which may clarify their understanding of their community and how the issue affects them.
Finally, audience-interactive visual aids are simply fun. They tend to enliven a group as audience members switch from primarily listening to the speech to “talking back.” It’s enjoyable to discover how everyone responded and to watch the speaker react to the feedback. When handled well—that is, when a speaker takes the time to process the audience’s feedback in the visual aid and alter their speech accordingly—their credibility is strengthened.
Challenges
The advantages named already hint at the challenges with audience-interactive visual aids. First, they require time during a presentation to execute and process. Novice speakers typically underestimate the amount of time it takes to explain what you want the audience to do, have them do it, and then read and respond to the resulting visual aid.
Consequently, if you need to deliver a short speech with a strict time requirement, as is often the case for class assignments, we discourage the use of audience-interactive visual aids. You will likely spend too long on the visual aid, preventing you from meeting other core requirements for the assignment.
If you deliver a longer presentation with sufficient time, then we strongly recommend practicing the speech with the audience-interactive visual aid. Ask several family members or friends to listen to your speech and participate in the visual aid. That should give you a more realistic sense of the time you will need.
Second, effectively using audience-interactive visual aids requires speakers to talk impromptu in response to the audience’s input. Their feedback may result in a visual aid that looks very different from what you expected or practiced. As we mentioned, that surprise can be beneficial, but it can also be challenging, as you must respond and adjust in the moment. Box 12.6 explores an example.
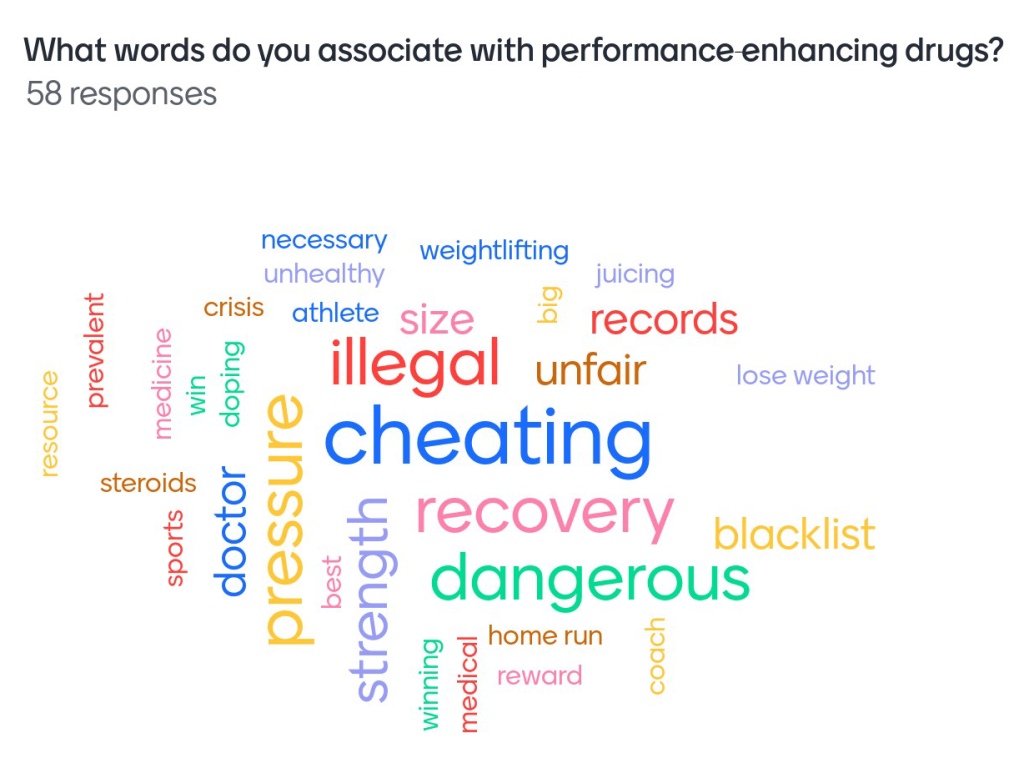
Box 12.6 Incorporating a Word Cloud into Your Speech
Imagine giving a speech on performance-enhancing drugs and asking your audience for three words that come to their minds. If their input resulted in the following word cloud, what might you point out about the visual aid? How might you use their input to argue a position?
Finally, as with presentation software and video, avoid the temptation to overuse audience-interactive visual aids. Don’t include polls, word clouds, live chats, and audience emoji reactions just because you can. Use them sparingly and strategically so the visual aid helps achieve your communication goal.
Having outlined three types of digital visual aids available to speakers, we end by considering how visual aids can aid your civic engagement.
Box 12.7 Representations of Data vs Representations of Real Processes or Things
Elements of visual aids tend to fall into two categories: representations of data and/or representations that display a real process, idea, person, place, or thing. You should ask yourself: “what type of information do I think needs to be accentuated? A statistic? An image of an idea?” Once you answer, the categories below can help you determine which aid would be the best to display that type of information:
| Representations of Data |
Representations of Real Processes, Things, Persons, Places, or Ideas |
|
Chart |
Maps |
| Graph | Photographs or Drawings |
| Diagram | Video or Audio Recordings |
| Objects |
See Chapter 10 in Speak Out, Call In: Public Speaking as Advocacy for more information about the elements listed above as well as best practices for incorporating them into your visual aid.
Visual Aids and Civic Engagement
This chapter began with the claim that visual aids enhance communication and even function as communication themselves. Consequently, we must tackle questions of the ethical and unethical use of visual aids. Like any rhetorical act, visual aids can be used to clarify and inform, or they can be used to obscure and mislead. As you produce visual aids for your presentation, then, it is important to use them in ways that promote productive discourse and civic engagement.
Good or ethical visual aids embrace qualities of productive discourse that enhance and promote civic engagement. Three qualities are particularly important to keep in mind as you select visual aids: learning, lateral communication, and imagination.
- Learning: As you select images, choose ones that help your audience learn about the issue at hand rather than merely entertain. As a speaker, one of your goals is to encourage your audience to participate in public issues, and you can do this by using visual means to strengthen their grasp of the topic and its relevance to their lives.
- To prompt lateral communication—that is, multidirectional communication among members of the public—design and select visual aids that distill information or do not require highly technical knowledge to discern. That way audience members with different levels of knowledge or background can converse with one another on a more level playing field. Select visual aids that help clarify issues. Avoid images that are more likely to exclude or confuse.
- Imagination: Notice that the word “imagination” is related to the word “image.” Your visual aids should do more than present the facts to the audience; they should help audiences see the issue and creative ways forward. Productive discourse helps audiences visualize new possibilities or imaginative solutions; it prompts them to build a new vision for understanding one another and addressing controversies. When you use visual aids, design and select images and videos that help the audience imagine the public issue or themselves in a different way.
Bad or unethical visual aids oversimply complex issues and impede civic engagement by using qualities of unproductive discourse such as division, combativeness, and certainty.
- Division: Visual aids that highlight the main points of a complex issue can inadvertently suggest the issue is simpler than it really is. A list of bullet points, a singular image, or an animated GIF, for instance, can make conclusions appear obvious. Such oversimplification can imply that alternative points of view are ill-informed or silly and thus promote division. Audiences are encouraged to distance themselves from—rather than better understand—people with different interpretations.
- Combativeness: Unethical speakers can use visual aids to overly simplify and belittle their detractors’ positions. Such intentional oversimplifications are themselves a form of combativeness, as they unfairly represent and impact the implied and implicated audiences (as discussed in chapter 2). Their use can further promote combativeness with people who argue for alternatives or offer more nuanced analyses.
- Certainty: Images that present data as decisive, when conflicting data or alternative plausible interpretations exist, can leave the audience with a false sense of certainty. The oversimplification in this case can lead the audience to feel assured that there are simple solutions to problems they have not fully thought through.
For more on productive and unproductive discourse, see chapters two and three of Public Speaking and Democratic Participation: Speech, Deliberation, and Analysis in the Civic Realm, 2nd ed.
As a presenter, you have an ethical obligation to construct visual aids that promote civic engagement by offering clarity and enabling lateral communication and imagination. You should opt for visual aids that treat topics, evidence, and alternative points of view fairly. Avoid oversimplifying them and inadvertently promoting such hallmarks of unproductive discourse as division, combativeness, and certainty.
Designing and Using Visual Aids to Reach an Audience
The previous section introduced you to three types of visual digital aids: presentation software, video, and audience-interactive visual aids. Understanding the strengths and drawbacks of each is helpful. However, knowing how to design and use them effectively is essential.
This chapter gives you specific advice—dos and don’ts—for designing and using visual aids. Much of what follows applies to any of the three types of visual aids, and we will highlight how as we go. We begin with designing or preparing visual aids. We then turn to using or incorporating visual aids into a presentation.
Design Principles
In the previous sections, we established four goals for visual aids: increase the clarity of your message, enhance audience attention and recall, strengthen your credibility, and improve your effort to inform or persuade the audience.
How do you produce visual aids that help accomplish these goals? We offer eight design principles—or advice to follow—to guide your preparation: visual aids should be visual, less is more, consider spacing and positioning, use color strategically, consider what your visual choices suggest, consider readability for all audience members, strive for high quality, and follow copyright and academic honesty rules.
Visual Aids Should Be Visual
We begin with the design principle—and reminder—that visual aids should be visual. If you are tempted to put blocks of text or bulleted lists into presentation software or a video, stop yourself. Ask if that same information can be communicated visually. For example,
- Can you show a photograph of the person you are quoting rather than simply typing the quote?
- Can you display a fraction, like ¾, by displaying four stick figures and coloring three of them blue and one green rather than just writing ¾?
- Can you illustrate your point through a visual metaphor? Consider the example in box 29.1.
Box 12.9 Making Visual Aids Visual
Notice the following difference between a visual aid that presents information about plastic waste in textual form (on the top) and a visual metaphor (on the bottom).
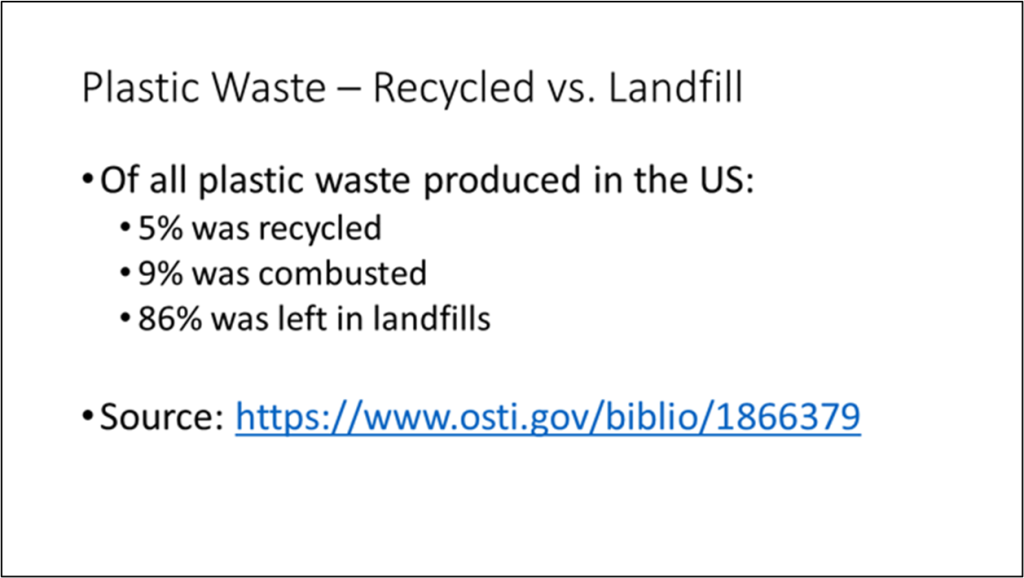
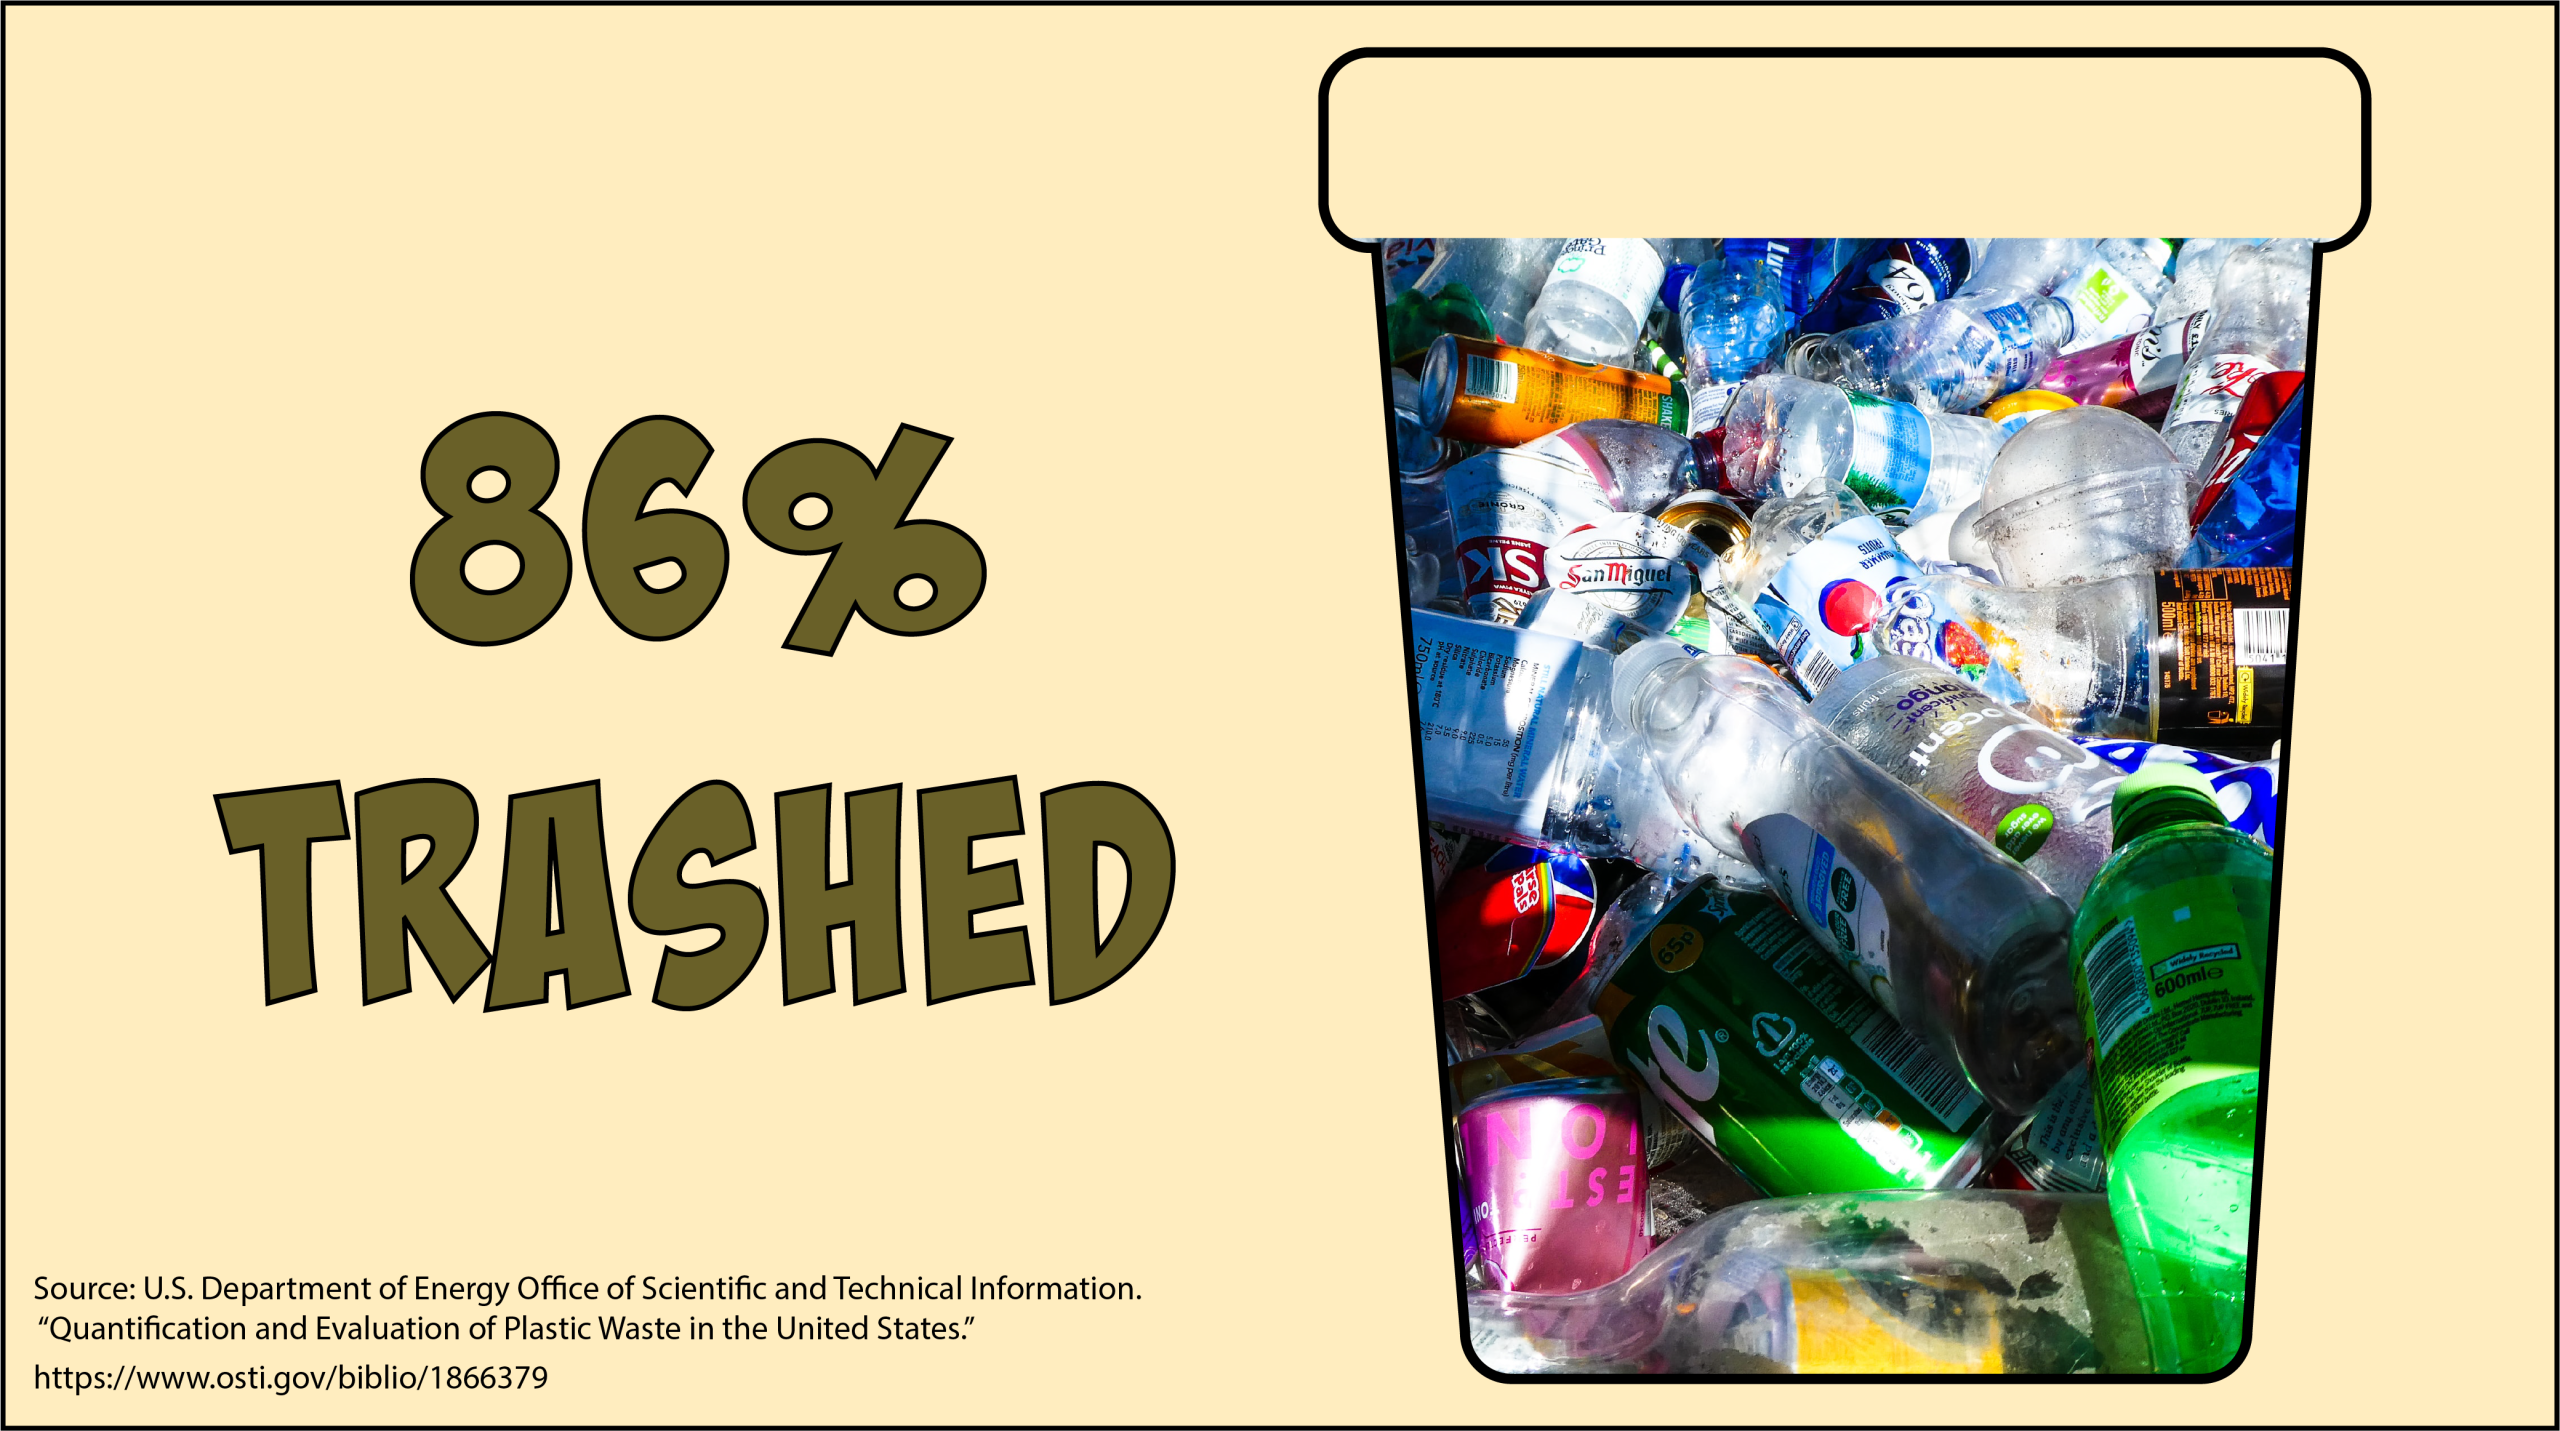
As you design your visual aids, reduce the number of words wherever possible and think of ways to visually communicate the information instead.
Less Is More

A second design principle is “less is more.” Any graphic designer will tell you not to be afraid of white space, or the empty space between elements on a slide or on the screen. Your audience will have a much easier time processing your photo, chart, or video footage if it is not overcrowded with information.
As you put together your visual aid, ask yourself, What is its central message? Will the audience have their eye drawn to that message?
- On slides, for instance, avoid putting multiple images—say, two charts and a photograph—on one slide. Instead, choose the single most impactful image to communicate the message. Give each image its own slide or moment if they make different points.
- In video, avoid adding multiple cuts, visual effects, and animation to a single segment. Allow for some degree of stillness so your audience can focus on the footage itself.
- When using audience-interactive visual aids, beware of pairing them with additional visual aids. It can be very difficult, especially for an older audience, for example, to skim viewers’ live chats while also watching a video clip.
Consider Spacing and Positioning
Third, consider spacing or positioning when designing visual aids by paying attention to alignment and proximity. Alignment is the deliberate placement of the elements within a given slide or frame. Alignment includes how photos, text, and captions are lined up with one another (center them, left-justify them, etc.). You don’t want anything to look randomly placed. When elements on your slide or in the camera’s frame, like corporate logos or titles, have visual similarity in where they appear and in relation to one another, your presentation looks more professional.
Proximity says that items that are similar should be placed next to one another. Placing items together creates a visual unit, and the eye readily understands that these elements are part of a group. If you are talking about the advantages or drawbacks of a particular solution, for instance, the proximity principle says,
|
The advantages should appear together, |
and |
the disadvantages should appear together. |
Mixing or randomly placing these elements confuses rather than clarifies. The purpose of proximity is to help organize the material for the audience.
Box 12.10 Using White Space and Alignment in Visual Aids
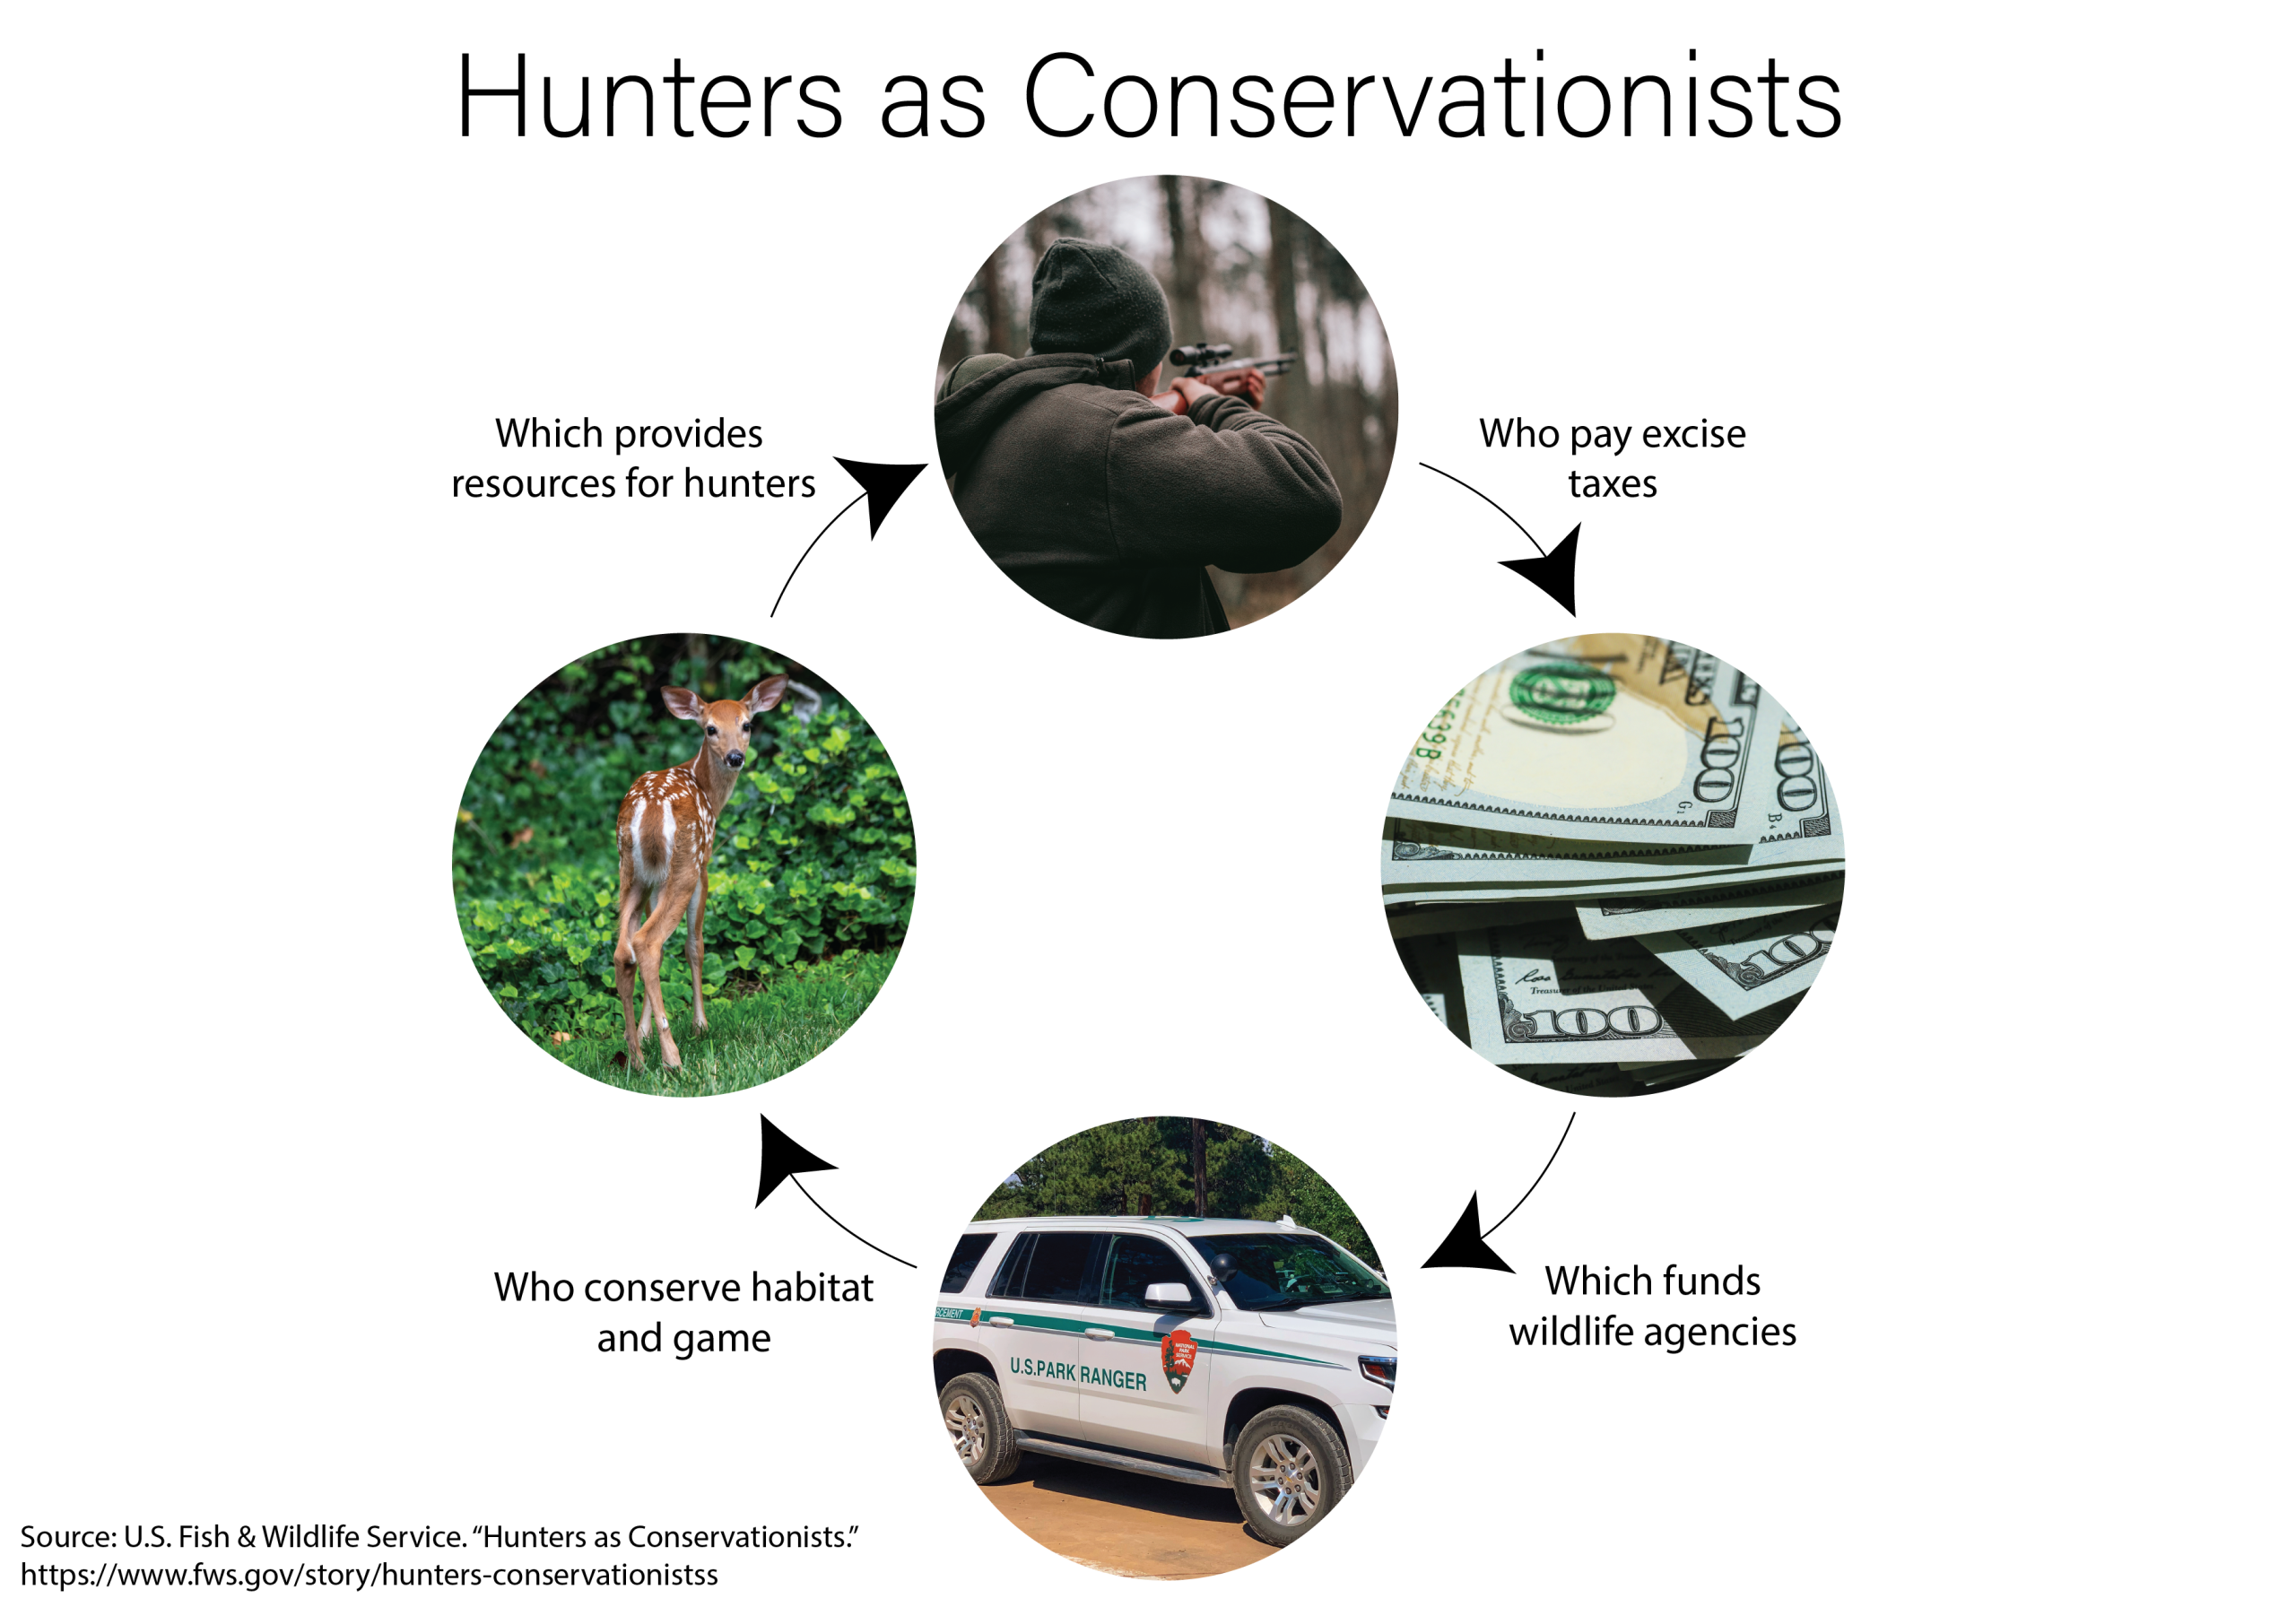
Imagine a student who wants to deliver a speech that advocates the ecological benefits of hunting.
Slide A: This slide was hastily designed. It offers a confusing and crowded collage of images associated with hunting. The audience would not be sure what to focus on or what conclusions to draw from it.

Slide B: This slide more effectively supports the student’s message because it strategically incorporates white space and aligns images in a meaningful way.
Use Color Strategically
A fourth design principle is to use colors strategically, such as through contrast and harmony. Visual contrast is optical difference, and the idea here is that you should make elements that are different from one another in kind visually different as well. For example, imagine using the following:
|
An orange background for images of trash contrasted with… |
|
a green background for images of recycling. |
|
Gray tones for items that cannot be recycled, contrasted with… |
|
bright colors for items that can be recycled. |
Contrasting colors can create a visual “pop” and quickly help the eye determine what is important or different.
Visual harmony, on the other hand, is the pleasure produced by colors that complement or go well together. You generally want all the colors you choose on a given visual aid or within a video, even when contrasting, to produce harmony (thus, orange and green work nicely together even as they contrast). When color choices are disharmonious—such as if you pair canary yellow with neon green—the resulting visual aid can produce discomfort and distract the audience.
Consider What Your Visual Choices Suggest
Fifth, consider what your visual choices suggest. Rhetorical scholar Sonja K. Foss writes that we can understand and evaluate the nature of an image by paying attention to both its presented elements and its suggested visual elements. Presented visual elements are the “major physical features of the image,” such as size, color, shapes, form, background, and so forth. Suggested visual elements are “the concepts, ideas, themes, and allusions that a viewer is likely to infer from presented elements” (Foss, 2005). In other words, suggested elements may help us determine how audiences receive and understand the image.
Many types of visual choices communicate information to audiences:
- We already mentioned that alignment and proximity can suggest similarities or distinctions among visual elements.
- Size differences can allude to distinctions such as inferring the superiority of large images compared to the weakness or inferiority of smaller images.
- Certain colors can suggest emotions and associations. We relate red with anger, passion, and danger, for example, and pink with femininity. In Western cultures white connotes purity (the origin of the traditional white wedding dress), whereas in China, white is associated with death and is the color of mourning. Chinese brides wear red, a color that signifies good fortune.
Cultural contexts may be important to keep in mind as you anticipate what your visual choices suggest to your audience. For an example of how to use presented visual elements effectively to suggest information that supports your point, read box 29.3.
Box 12.11 Visual Elements Function Rhetorically
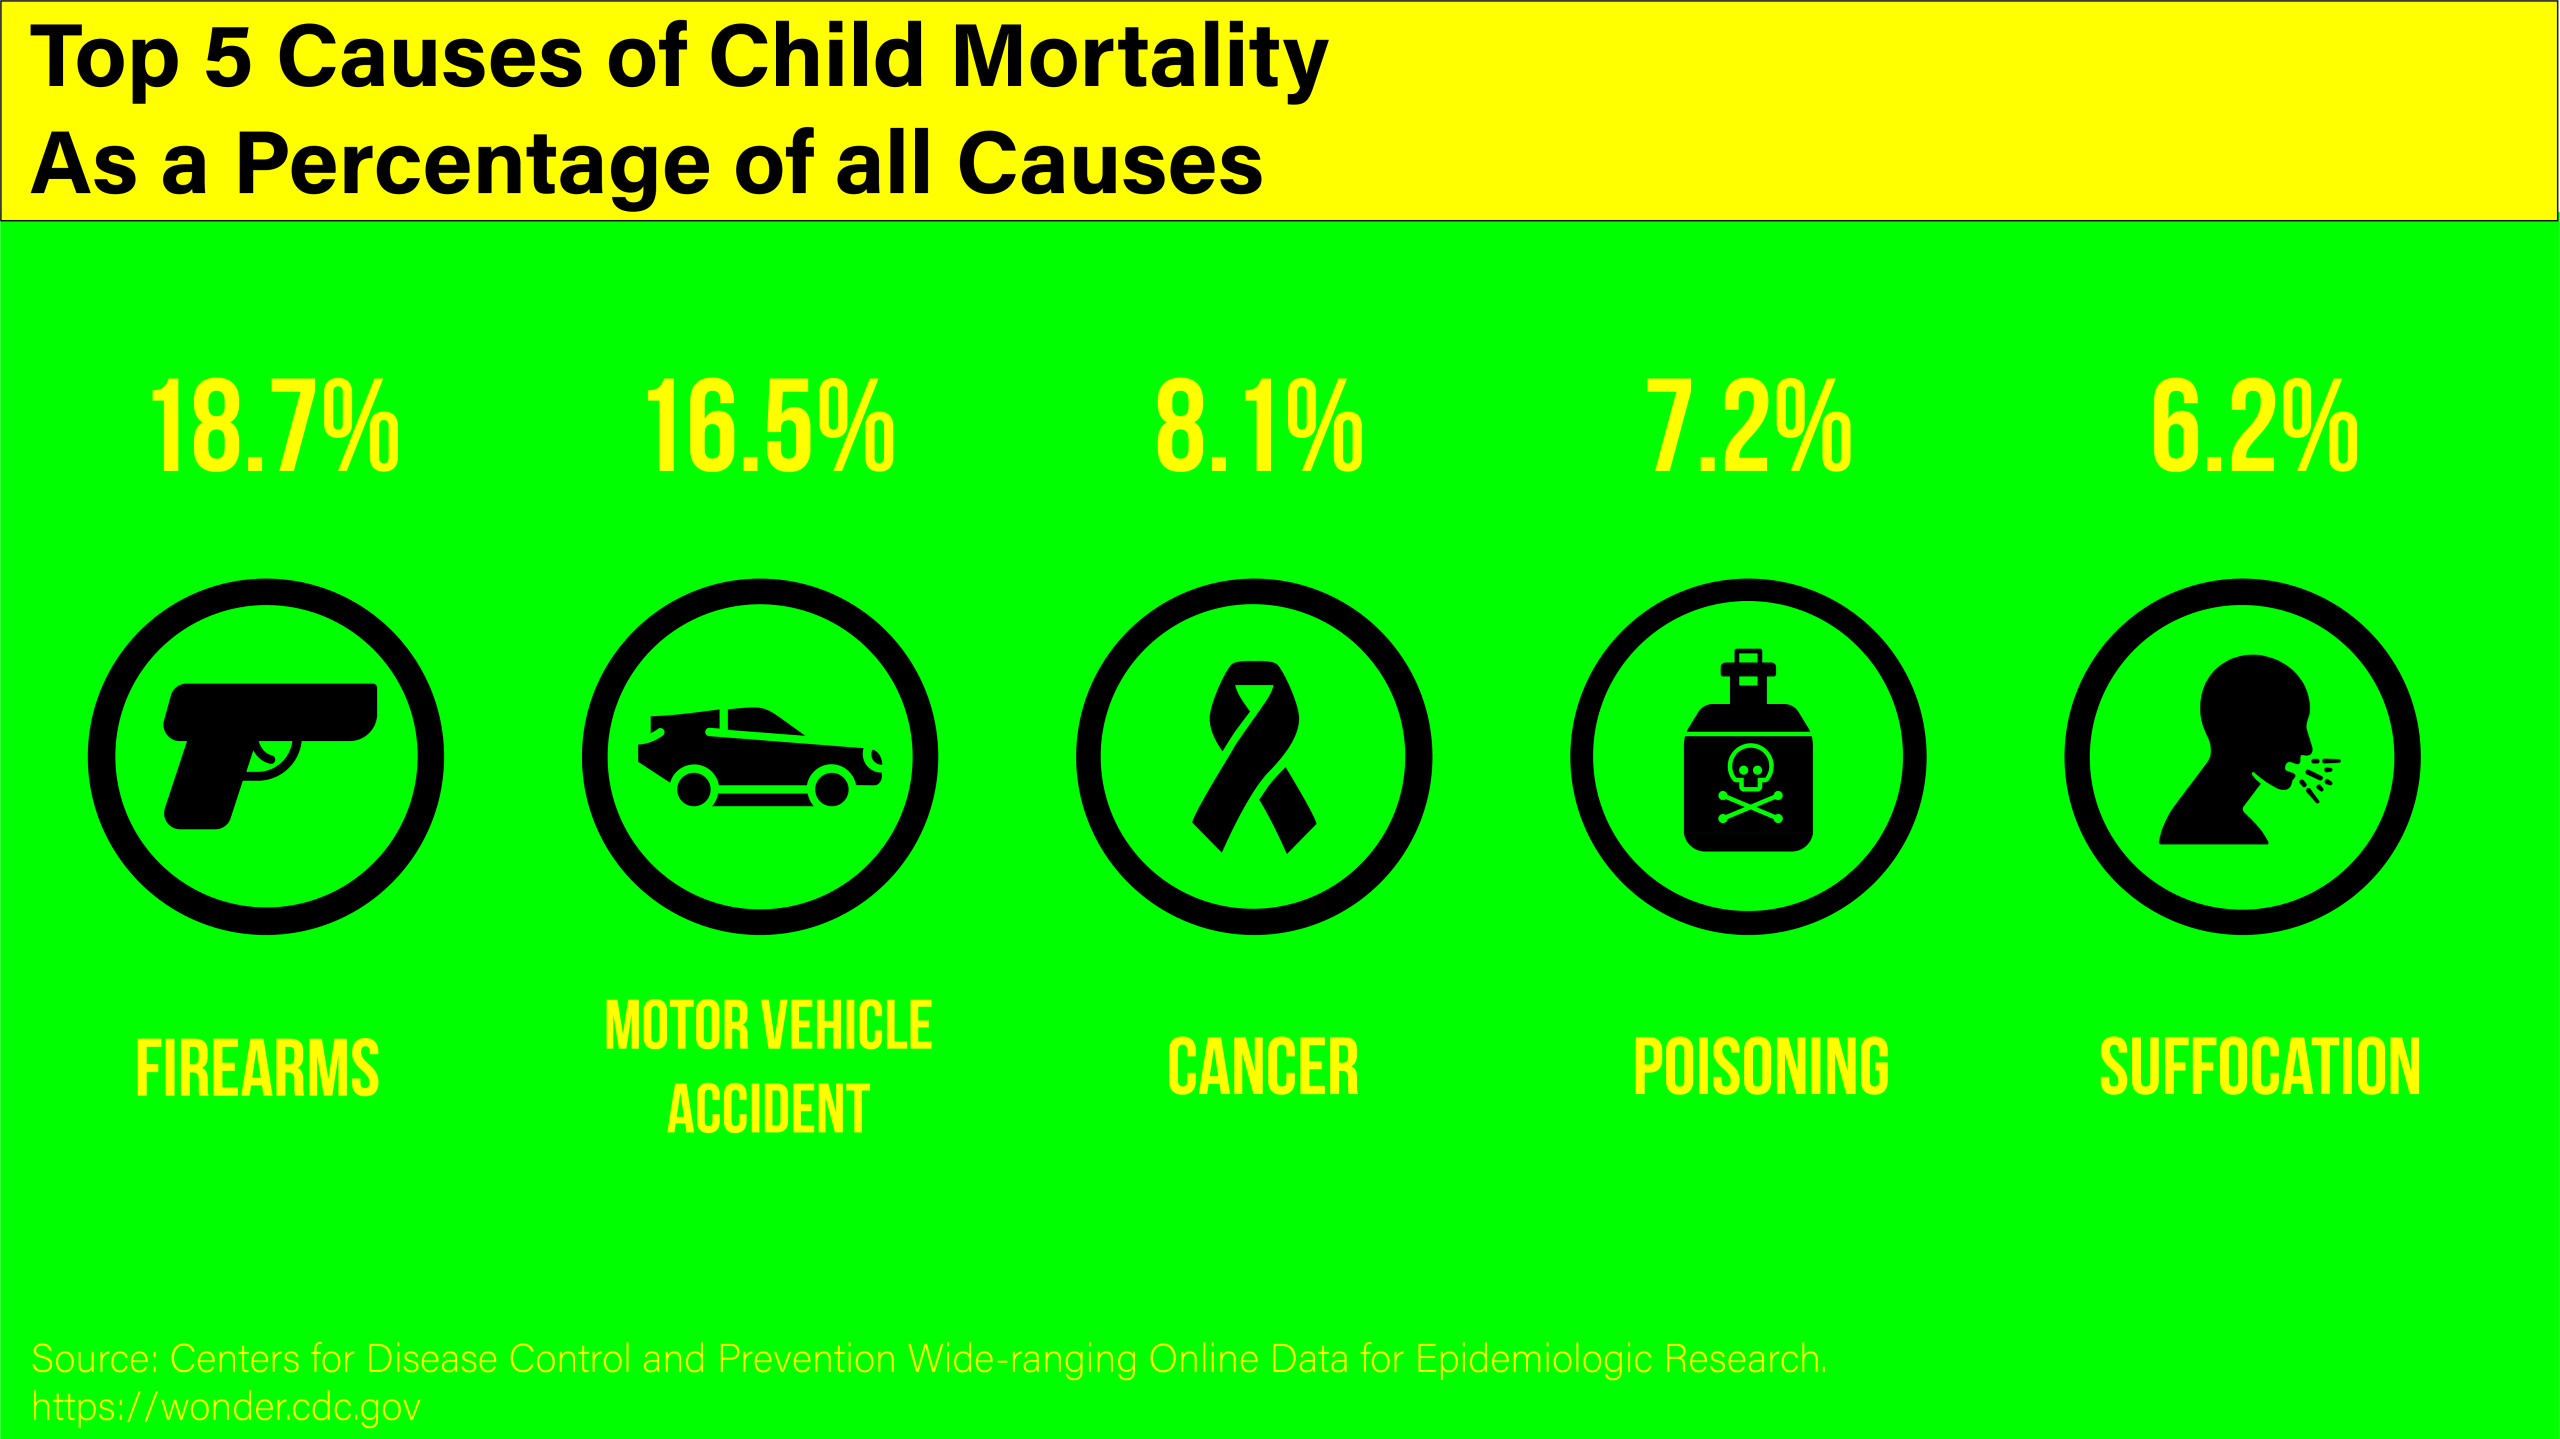
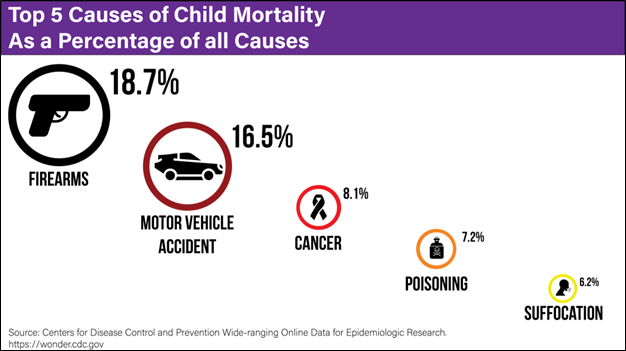
If you delivered a speech about the harms of firearms for children in the US, which slide would better communicate your message?
Slide A: This slide presents disharmonious colors, making it unpleasant to look at. Also, its visual layout suggests that all causes of child mortality are equal even though the percentages indicate otherwise.
Slide B: Notice how this slide makes use of differences in positioning, size, and harmonious colors to suggest that one cause of child mortality—firearms—is greater and more worrisome than the others. We tend to associate height, larger size, and darker colors with importance or authority.
Ensure Readability
Sixth, consider readability for all audience members. Remember that what is clear and visible on your computer screen may translate well for viewers watching through a screen remotely, but not for an in-person audience when projected onto a screen. Yellow, for instance, can be very difficult to read when projected, especially against a white background.
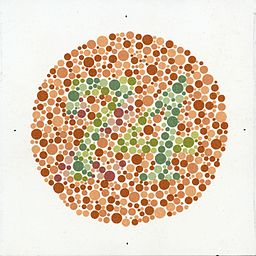
Remember, too, that audience members may have varying quality of vision. Thus,
- As you choose images and fonts, go larger than you might otherwise and avoid overly fancy or embellished font styles.
- If you are showing video and want audience members to see particular elements, pause the video and point to those elements or also use (possibly enlarged) still shots taken from the video to ensure everyone can see the crucial parts.
- Know, too, that a fair number of people have color vision deficiency (frequently referred to as being color blind), meaning they struggle to see differences between colors. Two of the most prevalent forms of color blindness are between red and green and between blue and yellow. So if you want to contrast colors, opt for alternative combinations.
Strive for High Quality
Seventh, strive for high quality in your visual aids. While it may seem unfair, nothing undercuts the impact of a carefully prepared speech like a typo in your visual aid. Audience members read such seemingly small errors as marks of carelessness or lack of preparation. Thus you should read and reread your visual aids for spelling or grammatical errors before your presentation.
Similarly, a low-quality image can hurt your credibility. This is especially true when presenting in person. An image needs to be large enough for the people in the back of the room to see, and it should not be blurry or pixelated when projected.
Creating your own visual aid better ensures a high-quality image. Previously, we explained that making your own visual aid also ensures it is customized to your specific speech’s needs. The final usage principle will add that using your own image avoids copyright concerns.
Follow Copyright and Academic Honesty Rules
Finally, follow copyright and academic honesty rules. It can be difficult to navigate copyright laws, especially when speaking in an educational context. Therefore, we provide guidance both for the images or video clips and for citing them.
Creating or Borrowing Images and Video
To be safe, whenever possible, create your own images (pictures, charts, infographics, etc.) and video (clips, GIFs, etc.).
If it’s not possible to make your own, use images and videos that are legally free to use. These might be called “open access,” “Creative Commons,” “public domain,” “royalty-free,” “free stock,” or simply “free,” and there are many websites devoted to them. Just search for “Creative Commons images” to find several websites. Alternatively, after conducting a Google Images search, find the Google “Tool” that allows you to specify that your results only show images with “Usage Rights” set to “Creative Commons licenses.”
Once again, you should also discover what resources your college or university can make available to you. It is possible your library already subscribes to an image service you can use for free. Otherwise, if an image or video does not explicitly give you permission to use it, assume it is protected by US copyright law.
If you really want to use a copyright-protected image or video and do not have explicit permission to use it, try to obtain permission from the copyright holder. Explain who you are (likely a student), what you want to use (the specific image or video), what you will use it for (likely a class assignment), and who the audience will include (likely your instructor and classmates). This path can be simple if the holder is clearly named, is easy to contact, is quickly responsive to your request, and grants you free access. More typically, however, it is not that easy or fast, which is why creating your own images or finding legally available images or videos is a preferable option.

Fortunately, in some cases, you can legally use copyrighted images or video clips without receiving permission. Fair use is a legal doctrine that allows copyrighted material to be used without explicit permission, based on four factors:
- the purpose and character of use
- the amount or substantiality of use compared with the work as a whole
- the nature of the copyrighted work
- the effect on the potential market for sale or value of the copyrighted material
You must apply these four factors each time you want to use a copyright-protected image or video to assess the applicability of fair use. Your librarian or professor may be able to help you, and your college or university may have a guide to fair use that provides a more detailed explanation.
Citing Images and Video
Whenever you use images or videos you did not fully create by yourself, exercise academic honesty by correctly citing them. That means abiding by the following advice:
- Follow a style guide (like MLA or APA). They typically have citation guides for artwork, YouTube videos, social media posts, and so on.
- If you used legally free images or videos, follow the TASL method (see Box 12.9) developed by the creators of Creative Commons licenses.
- If you used some form of artificial intelligence (AI) to produce a visual aid, follow our guidance in chapter 4 for citing the use of AI tools: Name the AI tool and version you used as well as the company that makes it, list the date you used the tool and what you used it for, and include a URL to the tool.
- If you used copyrighted material based on the fair use doctrine or with the originator’s permission, you should specify that along with your citation.
Box 12.12 Citing Open Access Materials with Creative Commons Licenses
To cite Creative Commons material, follow the TASL Method developed by the creators of Creative Commons licenses. That means your citation should identify the following:
Title: If the written or visual material has a title, identify it. If not, ignore this.
Author: Name the author (licensor) of the material, using the way they name themselves. Link to the author’s profile page, if available.
Source: Identify where the material can be found and link to it.
License: Name the specific Creative Commons license and link to it.
You could cite the below image using the following citation: Maryland GovPics, CC BY 2.0, via Wikimedia Commons
 There is no one way to communicate the TASL information. We recommend you consult a style guide and your instructor for specific preferences.
You might wonder where you should include citation information for viewers. You can ‘credit page’ at the end of the slide deck or video or add citations to the visual slides or in the video itself. If you choose the latter, you can use a small font and a low positioning of the citation so it does not compete with the image or video for the audience’s attention. Wherever you communicate a citation, including one builds your credibility by giving credit to the source who created the image or video clip.
Box 12.13 Improving Your Visual Aid Design
After you have created a visual aid, improve it by using the design principles and answering the following questions. Alternatively, apply the principles to a peer’s visual aid to help them improve their design.
|
Design Principle |
Questions to Ask about the Visual Aid |
|
Visual aids should be visual. |
|
|
Less is more. |
|
|
Consider spacing and positioning. |
|
|
Use color strategically. |
|
|
Consider what your visual choices suggest. |
|
|
Consider readability for all audience members. |
|
|
Strive for high quality. |
|
|
Follow copyright and academic honesty rules. |
|
Usage Principles
Once you have designed your visual aids, plan how you will incorporate them into your speech. We offer five usage principles, or advice, to guide you.
Verbally Introduce and Explain Your Visual Aids
 First, verbally introduce and explain your visual aids. Do not expect your visual aids to speak for themselves or for their connection to your speech to be self-evident. Instead, introduce your slide, video clip, or audience-interactive visual aid by providing a transition and any necessary context or instructions. Then explicitly acknowledge your visual aid and explain what you hope the audience notices or concludes from it.
- If you display a chart, graph, map, or photograph, for instance, point out what you want the audience to visually attend to.
- If you play a video clip, cue the audience for what to look for and/or explain afterward what they should have noticed.
- If you use an audience-interactive visual aid, draw conclusions from the resulting visual aid that the audience’s feedback helped produce.
Give the Audience Time to Digest Your Visual Aids
A second usage principle is to give audiences time to digest your visual aid. It takes people a moment to process a visual aid, even when it’s simple. Consider pausing while they watch or read, and plan that moment into your allotted time. When you talk, speak about the visual aid, which buys your audience more time to focus on it. If you too quickly move to the next point in your speech, the audience’s attention will be split between listening to you and reading your slide, chart, or GIF. They are more likely to pay attention to the visual aid than to you.
Do Not Be Afraid of a Blank Slide or Screen
Third, do not be afraid of a blank slide or screen. Shifting to a blank screen at key points in the speech—for instance, when you want to tell a story—is a great way to refocus attention on you and your ideas. You do not need to show an endless series of images or clips while you speak.
Talk to the Audience or Camera Rather Than to Your Visual Aids
Fourth, talk to the audience or camera rather than to your visual aids. When speaking in person, we recommend the following:
- Don’t turn your back on the audience to face your visual aids projected onto a screen. Keep your body facing your audience even as you glance at your visual aids to talk through them.
- Don’t read from your visual aids! Don’t stare at the slides as if looking for answers. Use your speaking notes instead and make eye contact with the audience if you are able.
When speaking remotely through a screen, we similarly insist on the following:
- Don’t read your notes from your computer or tablet screen nor look only at the visual aids you are sharing on your screen. If your face is visible, it is obvious to viewers that your eyes are looking down, away, or even left and right as you read your notes.
- Instead, look at the camera if you can, or, if appropriate, turn off your camera and just focus viewers’ attention on your visual aids while you discuss them.
Practice with Your Visual Aids
Finally, practice with your visual aids. This is one of the best pieces of advice we can offer. Many presentations could be more powerful if slides, a video clip, or an audience-interactive visual aid were timed better. Practicing your speech with visual aids will help you work out the timing and gain familiarity and confidence using them.
Box 12.14 Improving Your Use of Visual Aids
When incorporating visual aids into your presentation, abide by the following usage principles as you prepare and practice your speech:
- Verbally introduce and explain your visual aids.
- Give the audience time to digest your visual aids.
- Do not be afraid of a blank slide or screen.
- Talk to the audience or camera rather than to your visual aids.
- Practice with your visual aids.
Conclusion
In conclusion, we remind you that visual aids are powerful—and potentially fun—public speaking tools. As you plan and design your visual aids, keep your focus on the ways visual aids can assist and build civic engagement in a well-crafted speech. Visual aids offer many advantages to speakers when they are well designed and effectively incorporated into a speech. However, when poorly crafted or mishandled, visual aids can do more harm than good. Because of the communicative power of visual aids, it is important that speakers use them ethically, in ways that promote civic engagement.

.jpg)